
Herringbone Versus Chevron: Joint Shape, Layout and Cost
A bordered, multiroom herringbone floor may demand more work than pre-cut chevron in one rectangular room, so compare the actual product and layout.
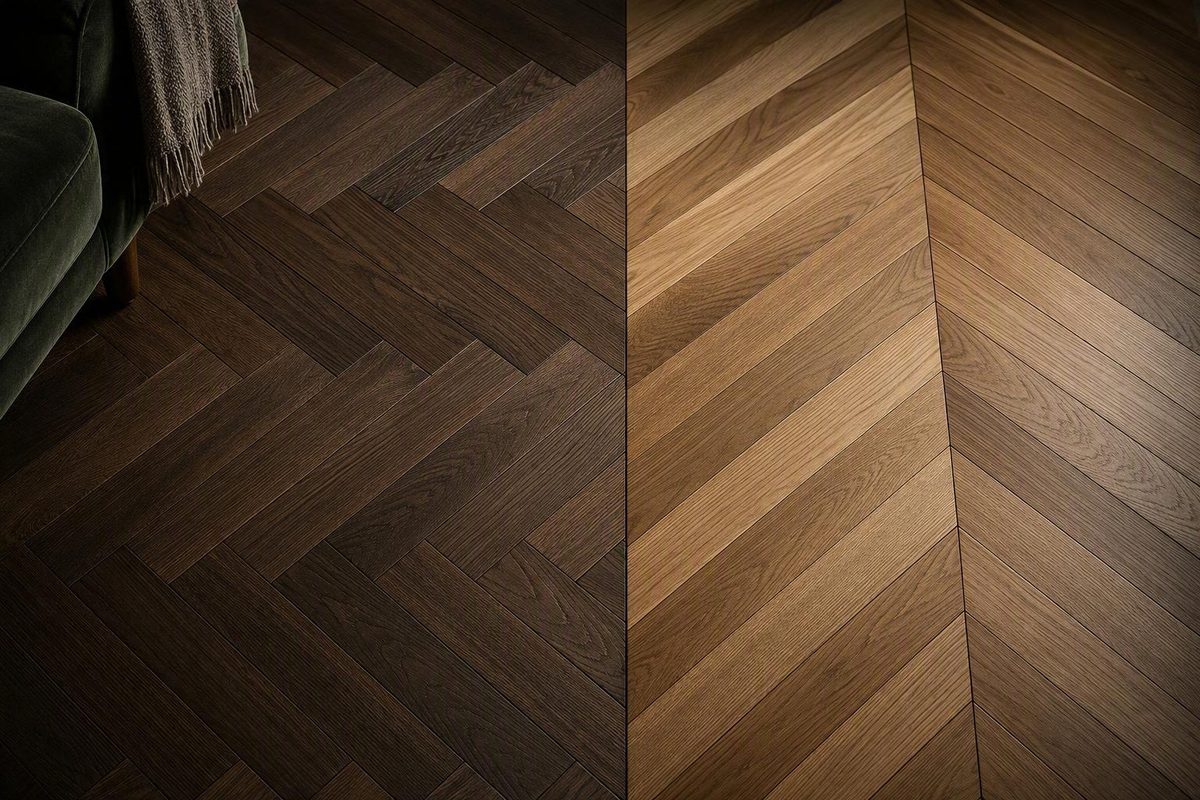
Herringbone and chevron both create zigzags, but their geometry is different. Herringbone uses square-ended rectangular pieces arranged at right angles, with the end of one piece meeting the side of another. Chevron uses angle-cut pieces that meet end-to-end at a point. Herringbone therefore creates a broken, staggered zigzag, while chevron produces continuous, aligned V shapes.
That difference affects product selection, pattern scale, centerline placement, perimeter cuts, waste, installation time, borders, transitions, and how readily errors can be seen. Chevron usually demands tighter alignment and may require specialized components, but product format matters: a factory-made chevron panel may be easier to handle than an elaborate loose-piece herringbone installation.
Neither pattern is inherently better. The right choice depends on the intended visual rhythm, room geometry, exact product system, substrate condition, installer capability, and total project budget.
The Difference at a Glance
The quickest way to distinguish herringbone from chevron is to inspect one joint:
- End meets side: herringbone.
- Angled end meets angled end at a point: chevron.
Herringbone pieces remain rectangular and meet at right angles. Chevron pieces have compatible angled ends that meet point-to-point. This creates the characteristic broken line in herringbone and the continuous V in chevron, as shown in TileBar’s pattern comparison.
| Feature | Herringbone | Chevron |
|---|---|---|
| Piece shape | Square-ended rectangle | Piece with angle-cut ends, or an integrated product reproducing that geometry |
| Joint geometry | End of one piece meets the side of another | Two compatible angled ends meet point-to-point |
| Finished line | Broken, staggered zigzag | Continuous, aligned V shapes |
| Alignment sensitivity | High, although minor variation does not disrupt one continuous row of points | Very high because successive points must remain aligned |
| Typical visual character | Layered, textured, interlocking | Symmetrical, directional, streamlined |
| Likely installation complexity | More involved than straight laying; rectangular components simplify some production and cutting | Often more exacting because of angled components, orientation, and conspicuous point alignment |
The defining geometry can be reduced to this annotated key:
HERRINGBONE                              CHEVRON

square-ended rectangles                  compatible angle-cut pieces

┌────────┐ /
│ │ /
┌──────┘ │ /
│ │ /
└────────┐ │ \/
│ │ /\
└──────┘ / \
/ \

end meets side                           angled ends meet point-to-point
broken, staggered zigzag                 continuous line of aligned V points
In close-up photographs, grout, bevels, grain, and framing can obscure the distinction. Ignore those details initially and trace the ends of the pieces. An alternating end-to-side sequence is herringbone; pairs that terminate together in regularly aligned points form chevron.
Herringbone supplies staggered texture and a distributed rhythm. Chevron supplies symmetry and a stronger directional axis. Those are different design effects, not evidence that one pattern is universally more attractive, prestigious, or suitable.
How Piece Shape, Angle, and Proportion Change the Pattern
Herringbone retains its right-angle relationship when the pieces become longer, shorter, wider, or narrower. Changing the proportions alters the scale and pace of the repeat, but it does not turn herringbone into chevron. Each rectangular piece still terminates against the side of the next.
Short herringbone pieces create frequent joints and a tighter, busier rhythm. Longer pieces stretch the diagonal runs and reduce the number of visible repeats. Wider pieces give the geometry more visual weight, while narrow pieces produce finer detail. The same pattern can therefore look very different as a small mosaic, parquet block, long wood plank, or large tile.
Chevron changes through both piece dimensions and angle. A 45-degree configuration is common, but commercial products also use 60-degree arrangements, so “chevron” should not be treated as one standardized component shape (Great Britain Tile’s comparison).
Angle terminology can also be ambiguous. A description may refer to:
- The cut across the end of each piece.
- The position of a piece relative to the pattern centerline.
- The included angle where the two sides of the V converge.
- A manufacturer’s named configuration.
These measurements are related, but they should not be assumed to mean the same thing. Check the dimensioned product drawing and confirm exactly how the manufacturer defines the advertised angle before ordering or cutting material.
Changing the angle affects the apparent width and sharpness of the V. One configuration may form a broad, open arrow; another may create a taller, narrower point. Piece length changes the repeat as well: long boards create extended diagonal runs, while short pieces produce more rows of points.
Ordinary rectangular planks should not automatically be treated as suitable for chevron. Depending on the product, a chevron installation may require:
- Factory-cut left- and right-facing components.
- A coordinated set of angle-cut pieces.
- Preassembled mosaic sheets or parquet panels.
- A locking system engineered for the pattern.
- Accurate project-specific cutting of compatible material.
The selected product’s instructions must determine whether field-made components are permitted.
Before ordering, verify:
- Face dimensions and overall thickness.
- End angle and its stated definition.
- Whether mirror-image components are supplied.
- Coverage and quantity for each orientation.
- Panel dimensions and repeat.
- Approved installation direction and method.
- Border and perimeter components.
- Whether field cuts retain usable edges.
- The current product drawing and installation instructions.
Visual Character, Direction, and Room Effect
Herringbone looks layered because the eye encounters an interruption at every end-to-side joint. Its diagonal movement repeatedly changes direction and breaks, spreading texture across the surface. Grain variation, grout lines, bevels, and color changes can make that effect either quiet or pronounced.
Chevron is more symmetrical. Paired pieces create successive aligned points, allowing the eye to follow a continuous axis. Strong joint or color contrast emphasizes the arrows; low contrast softens them while preserving their direction.
Herringbone is often described as classic or traditional, while chevron is commonly associated with contemporary or architectural interiors. These are design associations rather than fixed rules. A pale, minimally beveled herringbone floor can look restrained and modern. A dark, richly figured chevron floor can work in an ornate setting.
Several variables may matter as much as the pattern name:
- Repeat scale: A small repeat creates more visual activity within the same area.
- Color variation: Strong variation makes individual pieces more conspicuous.
- Joint contrast: Dark grout or joints around light material emphasize geometry.
- Surface finish: Gloss and directional lighting may highlight edges or unevenness.
- Furnishings: Rugs, islands, and large furniture interrupt the repeat.
- Orientation: Rotating the same pattern changes its relationship to entrances and windows.
- Border treatment: A perimeter frame can contain the field or introduce competing geometry.
- Visible surface: A sample that looks balanced alone may feel busy across an open room.
Continuous chevron lines may draw attention along a chosen axis. Herringbone’s broken repeat may distribute movement more broadly. These are visual perceptions, not guarantees that either pattern will make a room look larger, longer, or wider.
Commercial recommendations conflict about compact rooms. Some favor chevron in narrow spaces because of its strong direction; others warn that pronounced points can dominate a small or interrupted surface. Instead of applying a universal room-size rule, assess the main sightline, repeat scale, material contrast, exposed floor area, and competition from doors, fixtures, cabinets, and furniture.
A compact powder room, for example, may accommodate a low-contrast chevron mosaic more comfortably than an oversized, high-contrast herringbone tile. Conversely, long herringbone pieces in a quiet finish may look less visually dense than short chevron pieces surrounded by dark joints.
Evaluate a full-room mockup or scaled layout rather than one pair of sample pieces. At minimum, assemble enough material to show several repeats in both directions. Photograph it from standing height and from the primary entrance. A close-up sample reveals finish and color but not how the pattern behaves across the room.
Judge direction from:
- The primary entrance.
- The longest unobstructed sightline.
- Hallways leading into or away from the room.
- Windows and architectural focal points.
- Adjoining rooms with visible flooring.
- Doorways where a centerline or border must terminate.
One orientation may not serve every viewpoint equally well. Choose the priority view, then design secondary transitions deliberately rather than allowing the pattern to stop accidentally.
Installation: Why Chevron Usually Demands More Precision
Both patterns require more planning, fitting, and checking than a straight layout. A small starting error can multiply across repeated rows, and geometric joints make cumulative drift conspicuous.
Herringbone is relatively forgiving, not easy. Rectangular pieces simplify component production, and minor variation does not interrupt one continuous row of center points. Even so, an inaccurate starter area, inconsistent joints, or incorrectly sized components can distort the repeat and create difficult perimeter cuts.
Chevron is especially alignment-sensitive. Its points create a visible reference line through the room. A misplaced centerline, incorrect end angle, unequal mirror-image components, or slight rotation can cause successive points to wander. Commercial installation guidance consequently emphasizes accurate reference lines, dry fitting, transition planning, and repeated checks (Just Around the Corner Flooring’s layout guide).
A practical planning sequence is:
- Identify the product system. Determine whether it is loose-piece, panelized, mosaic-backed, clicked, nailed, glued, or set in mortar.
- Inspect the substrate. Resolve stability, cleanliness, flatness, and moisture conditions according to the product requirements.
- Measure finished boundaries. Include cabinetry, casings, hearths, columns, borders, and transitions.
- Choose the primary axis. Relate it to the entrance and dominant sightline.
- Establish control lines. Do not assume walls are square, straight, or parallel.
- Dry-fit complete repeats. Test both sides of the centerline, not only the central V or starter row.
- Calculate perimeter cuts. Shift the field where necessary to avoid conspicuous slivers.
- Resolve borders and transitions. Decide how the pattern meets thresholds and adjoining floors.
- Approve the layout. Use a scaled drawing, dry assembly, or sample section.
- Check continuously during installation. Monitor points, joints, row position, and distance from control lines.
Common failures include:
- A centerline drifting away from the intended axis.
- Chevron points wandering, flattening, or meeting unevenly.
- Inconsistent gaps or offsets in herringbone.
- Fragile slivers at walls, cabinets, or thresholds.
- Doorway transitions cutting through the repeat awkwardly.
-
Borders that are not parallel to the field.
-
Panel seams becoming more visible than the internal pattern.
- An imbalance of directional chevron components.
- Two adjoining patterns meeting without a deliberate break.
Installation methods vary by material and product. A wood floor may permit nailing, gluing, floating, or only one proprietary method. Pattern or material category alone does not establish an approved method.
Factory-cut boards, mosaics, parquet panels, and locking systems can reduce on-site cutting or individual-piece handling.
DIY feasibility should therefore be judged project by project:
- Is the room rectangular and unobstructed?
- Does the design include a border?
- How many doorways and transitions are present?
- Does the substrate already comply with the product requirements?
- Are the necessary cutting, measuring, setting, or fastening tools available?
- Can mistakes be corrected without damaging the product?
- Does the system require mirror-image components?
- Has the installer completed comparable work in the same material?
A locking product in a simple room may be more approachable than loose blocks fitted inside a border. A mesh-mounted chevron backsplash may reduce piece handling but still require tile-setting skill. Conversely, a herringbone floor crossing several thresholds may be harder than a well-designed factory-made chevron panel.
Before committing to the full installation, approve a multi-repeat sample or drawing showing the centerline, border widths, perimeter cuts, doorways, and transitions.
Cost and Waste: Build a Project-Specific Estimate
Chevron often costs more because purpose-made angled components, precise alignment, slower fitting, and less reusable directional offcuts can add expense. This is a general tendency reported by commercial flooring guides, not a universal percentage or independently standardized comparison (Robbins Flooring’s cost discussion).
Published estimates are not directly comparable. Robbins and several installer guides place chevron waste above herringbone, while Pomona Hardwood Floors reports a range in which herringbone can be higher. The sources do not use standardized room shapes, product formats, borders, labor markets, or measurement methods (Pomona Hardwood Floors’ comparison). Treat such figures as publisher estimates, not ordering rules.
A complete project budget should include:
- Product price.
- Measured cutting waste.
- Defect and breakage contingency.
- Layout and installation labor.
- Substrate testing and correction.
- Existing-floor removal and disposal.
- Adhesive, mortar, fasteners, underlayment, or membranes.
- Borders and feature strips.
- Doorway transitions and edge profiles.
- Delivery and handling.
- Baseboard, shoe molding, or other trim.
- Site-applied finishing, if applicable.
- Labeled spare stock for future repairs.
Product format can reverse an assumed comparison. A herringbone floor with a picture-frame border, several rooms, and intricate thresholds may demand more work than a straightforward pre-cut chevron installation in one rectangular room.
Waste is driven by the interaction between the product and the space. Important variables include:
- Out-of-square, angled, or curved walls.
- Multiple doors, alcoves, columns, and cabinets.
- Narrow connecting areas.
- Picture-frame borders.
- Piece length and width.
- Fixed panel dimensions.
- Defects or selective color matching.
- Directional components.
- Cuts that cannot be reused on the opposite side.
- Minimum acceptable edge-piece size.
- Breakage during transport or cutting.
Use a scaled takeoff instead of multiplying net area by a blanket percentage. Place the exact product module at the approved orientation, then count full pieces, cut pieces, reusable offcuts, and non-reusable cuts. Add a documented contingency and intentional repair stock after that measurement.
A simple estimating worksheet can keep bids comparable:
| Estimate field | Project entry |
|---|---|
| Net measured surface area | ______ |
| Product name, dimensions, and format | ______ |
| Installation orientation | ______ |
| Full pieces, panels, sheets, or cartons | ______ |
| Measured perimeter and obstruction cuts | ______ |
| Non-reusable directional offcuts | ______ |
| Defect and breakage contingency | ______ |
| Retained repair stock | ______ |
| Removal and disposal | ______ |
| Substrate testing and preparation | ______ |
| Installation labor | ______ |
| Adhesive, mortar, fasteners, or underlayment | ______ |
| Border material and labor | ______ |
| Doorway and adjoining-floor transitions | ______ |
| Trim and finishing details | ______ |
| Delivery, handling, and taxes | ______ |
| Total estimated project cost | ______ |
Give each bidder the same product specification, scaled room drawing, orientation, border treatment, transition details, and substrate scope. Ask who owns the takeoff, what preparation is assumed, how unforeseen work is priced, whether repair stock is included, and what happens to unopened or leftover material.
That comparison is more useful than asking for a universal chevron premium. The answer depends on the actual assembly and room.
Materials, Substrates, Durability, and Maintenance
Both patterns are available in solid wood, engineered wood, ceramic or porcelain tile, and selected laminate or resilient-flooring systems. Availability varies by manufacturer, and some products reproduce the pattern within panels rather than using individually shaped pieces.
Material category does not establish installation approval. The selected product’s instructions must determine whether it can be:
- Floated.
- Glued.
- Nailed or stapled.
- Installed over concrete.
- Used below grade.
- Installed with radiant heating.
- Placed in a moisture-prone location.
- Used on a wall rather than a floor.
- Combined with a particular membrane or underlayment.
Engineered wood is generally described as more dimensionally stable than solid wood because of its layered construction, but that general property is not blanket approval for a slab, basement, humid location, or heating system. Construction, thickness, core, adhesive, finish, site conditions, and manufacturer testing still govern suitability (Carlisle Wide Plank Floors’ material overview).
Both patterns require a flat, dry, stable, properly prepared substrate. Repeated geometry makes unevenness, movement, and cumulative alignment errors conspicuous. Herringbone’s visual complexity does not compensate for an unsuitable base; chevron’s aligned points can make deviations especially obvious.
Obtain the selected manufacturer’s current requirements for:
- Substrate type and condition.
- Surface-plane or flatness limits.
- Moisture testing and acceptable results.
- Environmental conditioning.
- Expansion space.
- Approved adhesive or fastening schedule.
- Underlayment or membrane.
- Radiant-heating compatibility and operating restrictions.
- Acclimation, where required.
- Installation sequence.
- Cleaning and warranty conditions.
Do not transfer a tolerance, adhesive recommendation, or installation method from a visually similar product. Requirements can differ even within the same material category.
A poorly bonded chevron tile installation does not outlast a correctly installed herringbone surface merely because its lines are continuous.
Routine cleaning should be substantially similar when the material and finish are identical. Claims that chevron inherently traps more dust or that herringbone inherently lasts longer are not supported by geometry alone. Joint width, bevels, grout, texture, and cleaning method are product characteristics. Solidshape’s comparison likewise attributes maintenance more to construction, finish, traffic, and care than to pattern (Solidshape’s hardwood guide).
Retain labeled spare pieces after installation. Record the manufacturer, collection, color, finish, dimensions, angle, lot information, and orientation.
Match the Pattern to the Room and Product Format
Do not choose by a rule that herringbone belongs in small rooms and chevron in large rooms, or the reverse. Start with room geometry, exposed surface, sightlines, product scale, and transition requirements.
Layout scenarios
| Scenario | Primary sightline and centerline | Border and transition implications | Product-format considerations |
|---|---|---|---|
| Square room | The entrance, fireplace, or window may matter more than the mathematical center. Test the pattern on that axis. | Balanced-looking perimeter cuts may require shifting the field. A border can stabilize the design but adds alignment work. | Loose pieces permit fine adjustment; fixed panels offer less flexibility at opposing walls. |
| Narrow hall | The long axis usually dominates. Chevron can reinforce it; herringbone can create movement without one continuous arrow. | Side doors interrupt borders. End transitions should avoid clipped points and fragile slivers. | Smaller modules may fit thresholds and turns more effectively than long components. |
| Open-plan area | Decide which entrance or zone controls the main axis. One centerline may not align with every furniture group. | Choose whether the field continues, changes direction, or stops at a deliberate divider. | Panels can speed field coverage; loose pieces allow more custom zoning but increase handling. |
| Irregular room | Establish a reference axis independent of crooked walls. Prioritize the first or most important view. | Angled boundaries create unique cuts. Borders and recesses may consume substantial labor. | Rectangular herringbone pieces may permit more reusable cuts; directional chevron offcuts may be harder to reuse. |
| Multiple doorways | Select the doorway or connected sightline with priority and show the others on the layout. | Each opening needs a planned continuation, transition, or termination. | Compatible border pieces and profiles may simplify details. Verify directional-component quantities. |
In irregular or doorway-heavy rooms, rectangular herringbone pieces may simplify some perimeter fitting because the installer is not recreating an angled end for every field component. That does not make the project simple; borders, narrow recesses, and thresholds can still require considerable time and material.
In a long hall or open-plan sightline, chevron can establish a strong axis. Aligning the points with the intended view creates clear direction, but it does not guarantee that the room will appear larger. Lighting, contrast, scale, and interruptions affect that perception.
For a compact room, compare complete repeats rather than pattern labels. Determine how many V rows or herringbone units will remain visible after furniture and fixtures are installed. Either pattern can work when piece size and contrast suit the exposed surface.
Herringbone and chevron can coexist in adjoining zones when the relationship is intentional. A shared material, color, joint width, scale, or orientation can connect them. Without such a link, competing zigzags may look accidental.
For every room, settle four questions before ordering:
- Which viewpoint controls the pattern?
- Where does the centerline begin and end?
- What happens at borders and walls?
- How does the pattern meet every adjoining surface?
These answers are more dependable than selecting by room area alone.
A Practical Herringbone-or-Chevron Decision Checklist
Choose herringbone when you want a broken, layered zigzag and value the availability or adaptability of rectangular pieces. It can be somewhat more tolerant of small alignment variations, although accurate planning remains essential.
Choose chevron when you want continuous, symmetrical V shapes and a strong directional composition. The project must support compatible angled components, precise layout, and potentially greater product or labor expense.
| Project factor | Herringbone tends to fit when… | Chevron tends to fit when… |
|---|---|---|
| Visual rhythm | You want staggered texture and repeated interruptions | You want continuous points and symmetry |
| Room complexity | Irregular edges make adaptable rectangular pieces useful | The room offers a clear field and controlled axis |
| Sightlines | Movement should be distributed across the surface | A long sightline should become a deliberate feature |
| Available formats | Suitable blocks, tiles, panels, or locking products are readily available | Compatible pre-cut pairs, panels, mosaics, or engineered systems are available |
| Installation skill | The installer understands patterned layout and benefits from square-ended components | The installer can control angles, orientation, and point alignment |
| Borders | A layered field works cleanly with the proposed frame | The border meets points and diagonal runs without awkward cuts |
| Budget | Product and labor choices need greater flexibility | The budget can support specialized components or exacting work |
| Repair stock | Adequate matching rectangular pieces can be retained | Both directional components and proprietary trim can be stored |
Before purchasing, confirm:
- Piece dimensions and thickness.
- Pattern angle and how it is defined.
- Directional components.
- Quantity and coverage per carton or panel.
- Approved substrate and installation method.
- Adhesive, mortar, underlayment, or fastener requirements.
- Expansion and environmental requirements.
- Border and transition components.
- Cleaning instructions.
- Warranty conditions and exclusions.
Request physical samples, but do not judge one isolated pair. Build a multi-repeat dry layout that shows the rhythm, color variation, bevels, joints, and likely centerline. View it under the room’s daytime and evening lighting.
For expensive, irregular, or border-heavy work, obtain a scaled layout and itemized takeoff. The drawing should show full and cut modules, thresholds, cabinetry, borders, centerline position, and intended spare stock. Factory-made systems can reduce cutting, but they do not remove the need for accurate layout and substrate preparation.
Compare installer proposals on equal scope. Establish who is responsible for substrate correction, layout approval, transitions, measured waste, shortages, setting materials, trim, and retained spares.
The final choice returns to the joint between two pieces. Herringbone’s rectangles create a broken zigzag; chevron’s angled ends create continuous points. Then assess the complete project: room geometry, sightlines, product system, substrate, installation precision, measured waste, labor, repair stock, and budget.
Choose herringbone for staggered texture and adaptability; choose chevron for continuous symmetry and stronger direction.
Frequently Asked Questions
Is chevron the same as herringbone turned at a different angle?
No. Rotating herringbone does not make it chevron. Herringbone uses rectangular pieces with end-to-side joints; chevron uses angled components that meet point-to-point. Rotation changes the direction of the field, not its defining geometry.
Does chevron flooring always use 45-degree pieces?
No. A 45-degree configuration is common, but 60-degree and other purpose-made arrangements also exist (Flooring Surgeons’ geometry comparison). Because the advertised angle may describe different parts of the geometry, confirm the dimensioned drawing, profiles, orientation, and finished V before ordering.
Is herringbone easier for a DIY installer than chevron?
Herringbone is often more forgiving because it uses rectangular pieces and does not depend on a continuous row of points. It is not automatically DIY-friendly. Product system, borders, room shape, substrate condition, tools, and prior experience matter more than the pattern name alone.
How much more does chevron cost than herringbone?
There is no defensible universal percentage. Chevron often costs more because specialized pieces, point alignment, fitting time, and directional offcuts can increase product or labor expense, but panels and other factory-made formats may narrow or reverse the comparison (Floordi Canada’s cost overview). Compare itemized quotes based on the same room drawing, product class, substrate scope, borders, and transitions.
Do herringbone and chevron differ in durability or maintenance?
Not inherently. When material, finish, installation quality, environment, and care are equivalent, changing from herringbone to chevron does not itself create a durability or cleaning advantage. Follow the selected manufacturer’s care instructions and retain labeled spare pieces, including both orientations where the chevron system uses directional components.