
Subfloor for Tile Floors: Structure, Prep & Underlayment
Substrate, tile type, moisture exposure, movement, cracks, flatness, and allowable finished height determine the right assembly.
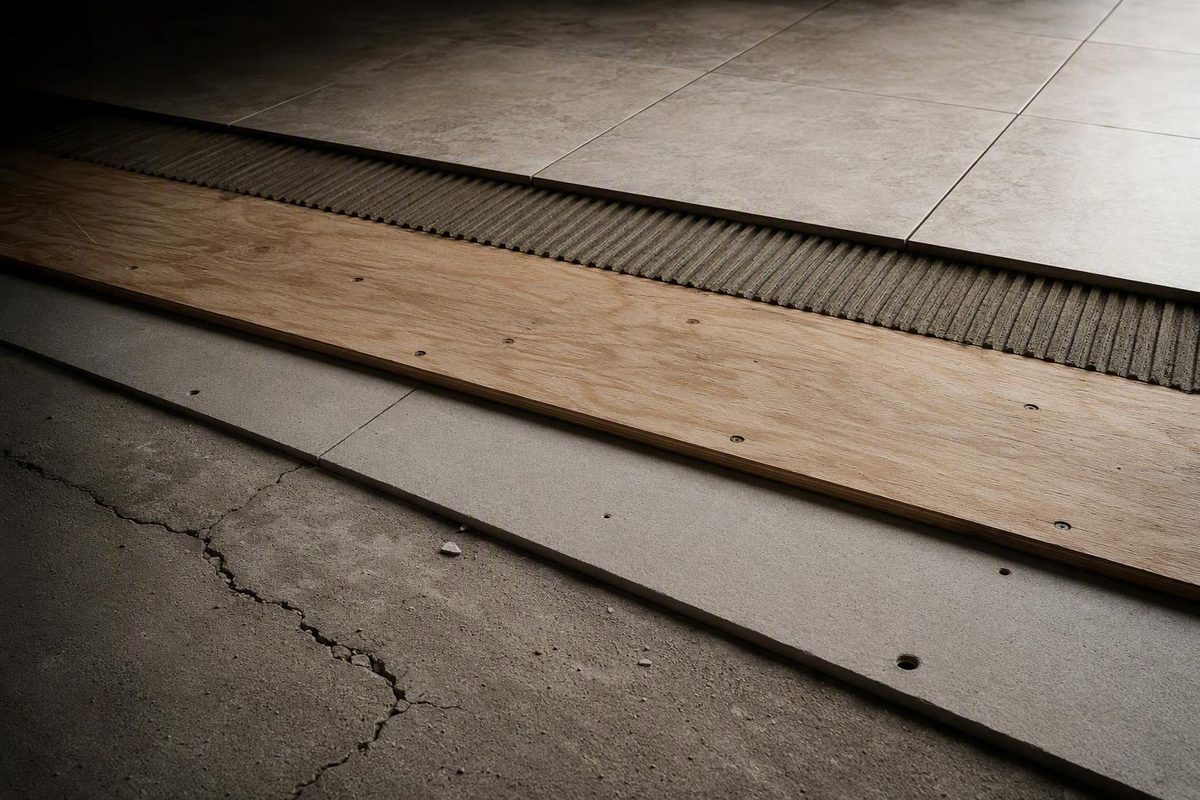
A suitable subfloor for a tile floor is a sound, sufficiently stiff wood structure or concrete slab topped with the tile-compatible surface required by the selected installation system. The correct assembly depends on the substrate, tile type, moisture exposure, movement, cracks, flatness, and allowable finished height. Cement board, membranes, patches, and leveling products can prepare an adequate structure for tile, but they cannot repair rot, unsupported seams, damaged framing, excessive flex, or an unstable slab.
The short answer: what belongs under a tile floor
The subfloor is the load-carrying structural layer. Over wood framing, it is usually plywood, OSB, or an older plank deck. A concrete slab may serve as both structure and substrate. Underlayment is a separate layer above the subfloor that creates or improves the tile-ready surface.
An illustrative floor assembly runs from bottom to top like this:
- Joists or concrete slab
- Structural panels, where applicable
- Additional structural plywood, if the wood assembly requires reinforcement
- System-approved surface correction, if required
- Tile backer board, uncoupling membrane, crack-isolation membrane, waterproofing membrane, or approved mortar bed
- Setting mortar
- Tile and grout
Not every project needs every layer, and flattening products do not occupy the same position in every system. The product and assembly instructions determine whether a patch or self-leveling underlayment belongs above the structural subfloor, below a backer board, or elsewhere in the approved stack.
A sound concrete slab may receive tile directly after cleaning, profiling, moisture evaluation, crack assessment, and flattening. A structurally adequate wood floor may use either backer board or an approved membrane assembly. Additional structural plywood may be necessary over weak panels or plank flooring, but structural panels and tile underlayment do different jobs.
Keep these functions separate:
- Cement backer board supplies a rigid, tile-compatible bonding surface.
- Uncoupling membranes manage limited differential movement between the substrate and tile.
- Crack-isolation membranes reduce transfer of qualifying minor in-plane cracks.
- Waterproofing membranes create a water-management layer when fully detailed.
- Patches and self-leveling underlayments correct surface geometry.
- Structural panels and framing repairs improve load distribution, capacity, or stiffness.
Some products perform more than one function, but the word “membrane” does not automatically mean uncoupling, crack isolation, vapor management, and waterproofing. Confirm every claimed function in the current product documentation.
Most importantly, tile underlayment is not structural repair. Backer board or a membrane cannot correct rotten joists, delaminated panels, unsupported edges, loose planks, or excessive floor movement.
Use this order of work:
- Identify the substrate and tile.
- Verify the structure and inspect for damage.
- Measure flatness.
- Assess moisture, cracks, and movement joints.
- Calculate the complete finished-floor height.
- Select an approved assembly that solves the remaining problems.
Pre-installation inspection: structure before surface preparation
A tile floor is nonstructural cladding. It depends on the framing and subfloor below it, and both joist deflection and panel deflection between joists matter. A floor that feels firm during a casual walk has not necessarily been verified for tile.
For a wood floor, record:
- Joist material, spacing, condition, and unsupported span
- Subfloor material: plywood, OSB, planks, or a combination
- Panel grade and thickness
- Panel orientation and fastening
- Whether panel edges and seams are supported
- Any bounce, squeaks, loose seams, raised fasteners, or visible movement
- Swelling, rot, staining, delamination, or previous water damage
- Cut, drilled, cracked, or otherwise damaged framing
L/360 is commonly cited as the deflection criterion for ceramic tile, while L/720 is commonly cited for most natural stone. Under L/360, for example, allowable deflection is the relevant span divided by 360. These ratios are not plywood-thickness rules, and adding cement board does not make an inadequate floor comply. The framing and subfloor system must control both joist movement and flex between joists, as this technical discussion of tile over plywood subfloors explains.
Do not choose a universal plywood or OSB thickness from a rule of thumb. Required construction changes with joist spacing, unsupported span, lumber or engineered-joist properties, panel grade, panel orientation, tile type, concentrated loads, and the selected industry or manufacturer-approved method.
Additional structural plywood can reduce between-joist movement and distribute loads. It still does not automatically provide the final tile-compatible surface. The approved design may require backer board, a membrane, or another specified layer above it.
Stop work when you find:
- Rot, swelling, or delamination
- Pronounced bounce or visible panel movement
- Loose or unsupported panel edges
- Damaged, cut, or deteriorated framing
- A floor whose joist capacity cannot be established
- Natural stone planned over an unverified wood structure
Where framing details are inaccessible or capacity is uncertain, have the floor evaluated by a qualified building professional before adding tile and its associated dead load.
Preparing plywood, OSB, and plank subfloors
Treat wood-floor preparation as two separate phases: first make the structure sound; then create the tile-ready surface.
Repair the wood assembly first
Replace swollen, rotten, or delaminated panels rather than covering them. Secure loose panels and investigate squeaks instead of assuming more screws will solve every movement problem. Verify that seams and edges have the support required by the selected assembly.
For existing plank floors:
- Repair damaged boards and secure loose planks.
- Verify the framing and overall stiffness.
- Add a properly designed structural panel layer.
- Install a tile-compatible board, membrane, or other approved system above it.
Do not treat dimensional planks as a universal direct-bond surface for tile.
Plywood face grain is generally oriented perpendicular to the joists for strength. In multilayer assemblies, joints should be offset rather than stacked directly over one another, and suitable panel and perimeter expansion gaps must be maintained. Exact joint placement, fastening, adhesive use, and gap dimensions depend on the selected assembly; do not combine details taken from unrelated methods.
Direct-to-plywood tile installations do exist, but they are tightly specified. “The floor is plywood” is not enough. Panel grade, thickness, number of layers, joist spacing, fastening, mortar compatibility, exposure, and workmanship all have to match the approved method.
Choose one defined tile-underlayment path
Two common paths over an already adequate wood floor are:
- Backer-board assembly: The specified board is supported in mortar, mechanically fastened, spaced, and seam-treated according to its instructions. The mortar below the board fills voids and provides uniform support; it should not be mistaken for structural reinforcement.
- Uncoupling-membrane assembly: A compatible membrane is bonded directly to an approved wood substrate with the specified mortar or adhesive. Some systems permit this without backer board.
Using both backer board and an uncoupling membrane is not automatically better. Added layers increase height, weight, labor, and compatibility questions. Each layer should perform a defined job and belong to an approved complete assembly.
Calculate height before buying materials
Add the installed thickness of:
- Any structural panel additions
- Patching or flattening material
- Backer board or membrane
- Mortar below and above the underlayment, where applicable
- Tile
Then check door clearance, thresholds, transitions to adjoining floors, toilet-flange position, stair dimensions, cabinets, and appliance clearance. A low-profile membrane may help control finished height, but it cannot replace structural plywood the floor actually needs.
Preparing a concrete slab for tile
Concrete can be an effective tile substrate when it is structurally sound, sufficiently flat, appropriately profiled, and within the moisture limits of the selected system.
Before bonding, remove anything that could interfere with adhesion:
- Dust and loose concrete
- Paint and sealers
- Adhesive residue
- Curing compounds
- Oil or cleaner residue
- Weak surface laitance
- Incompatible patching materials
Smooth or contaminated concrete may require an approved mechanical-preparation method rather than more mortar. Do not abrade suspect material.
Inspect every crack and document what is observable:
- Width, direction, and length
- Whether it reaches a wall, column, or existing joint
- Whether one side is higher than the other
- Moisture or staining along the crack
- Evidence of previous repair
- Recurring separation or continued widening, if its history is known
Minor in-plane cracks may be candidates for a load-bearing crack-isolation membrane meeting ANSI A118.12.
An uncoupling membrane, crack-isolation membrane, and waterproofing membrane are not interchangeable terms. A product may perform two or more roles, but only when it is designed, approved, and installed for those roles.
Concrete moisture also needs a system-specific answer. A taped plastic sheet or water-absorption check may reveal a possible concern, but neither supplies the quantitative result required when a mortar, primer, membrane, or leveling product specifies a formal test and acceptance limit. Follow the selected product’s current moisture-testing method.
Stop work for persistent dampness, efflorescence, suspected hydrostatic pressure, active or uncertain cracking, recurring crack repairs, moisture migration through cracks, or vertical slab displacement. There is no single curing period, moisture threshold, or crack-repair method that applies to every slab and tile system.
Make the substrate flat enough for the tile size
Flat and level are different. A floor may slope steadily across a room yet remain flat; another may be nominally level but contain humps and depressions that prevent uniform tile support.
ANSI A108.02 tolerances cited by the Ceramic Tile Education Foundation are:
- For tile with all edges under 15 inches: no more than 1/4 inch variation in 10 feet and 1/16 inch in 1 foot
- For tile with at least one edge 15 inches or longer: no more than 1/8 inch variation in 10 feet and 1/16 inch in 2 feet
These values and the associated tile-size threshold are summarized in the foundation’s tile-underlayment and substrate-flatness guidance.
Check the floor with a 6- to 10-foot straightedge, a procedure also described in this subfloor-preparation guide:
- Clean the surface so debris cannot distort the reading.
- Place the straightedge in several locations and directions.
- Rock or rotate it to reveal crowns and humps.
- Measure gaps beneath it.
- Mark high areas and outline low areas.
- Recheck after repairs and after installing any board or underlayment that could alter the surface.
Do not test only the centerline of the room. Check doorways, panel seams, slab cracks, perimeter areas, and the planned path of long tile edges.
Large-format tile requires the tighter tolerance. Correct the substrate before setting rather than trying to compensate for broad irregularities one tile at a time.
Match the correction to the problem:
- Suitable isolated high spot: Mechanically reduce it using a method appropriate for the known substrate and with the required hazard controls.
- Small depression: Fill it with an approved, substrate-compatible patch.
- Widespread low or uneven area: Use a properly specified self-leveling underlayment with the required preparation, primer, perimeter control, mixing, thickness, and cure.
- Assembly designed around a mortar bed: Build it to the approved thickness, reinforcement, and loading design.
Patches and self-leveling materials correct surface geometry. They do not ordinarily reinforce an underbuilt structure, waterproof the room, or manage crack movement. Ordinary tile-setting mortar should not be used for substantial flattening unless its manufacturer expressly permits the proposed substrate, area, and thickness.
Choose the underlayment by the problem it must solve
There is no universally best tile underlayment. Start with the diagnosed condition: do you need a bonding surface, movement management, crack isolation, waterproofing, or flattening?
| Material | Primary job and suitable use | What it does not fix | Moisture status and installation constraints |
|---|---|---|---|
| Cement backer board | Rigid, tile-compatible bonding surface over an already adequate wood subfloor | Rot, framing or panel deflection, unsupported seams, or slab cracks | Water-resistant, not a complete waterproofing system; generally requires supporting mortar, fasteners, gaps, and treated seams |
| Uncoupling membrane | Low-profile management of limited differential movement over an approved substrate | Structural weakness, damage, excessive bounce, or active cracks | Waterproofing and vapor functions vary; mortar, seams, transitions, and substrate requirements are system-specific |
| Crack-isolation membrane | Limits transfer of qualifying minor in-plane substrate cracks | Active structural movement, uncertain cracks, or vertical displacement | ANSI A118.12 is the referenced performance category; coverage, cure, movement joints, and substrate conditions remain critical |
| Waterproofing membrane | Creates a bonded water-management layer in wet applications | Structural weakness, flatness defects, or uncontrolled cracking | Sheet and liquid systems may conform to ANSI A118.10; seams, edges, penetrations, drains, and transitions must form a complete system |
| Patch or self-leveling underlayment | Corrects isolated or broad flatness defects | Flex, structural weakness, uncoupling, or automatic waterproofing | Substrate, primer, mixing water, thickness, drying, and moisture limits are product-specific |
| Reinforced mortar bed | Creates a designed tile substrate and can correct geometry or slope | Deficient framing unless the design separately addresses it | Thickness, reinforcement, cleavage or bonding method, height, and added load require an approved design |
The referenced ANSI A118.10 waterproofing and A118.12 crack-isolation categories are explained in the Ceramic Tile Education Foundation’s underlayment guide.
Cement backer board is useful when the structure is already adequate and the remaining need is a tile-compatible bonding surface. It is not meaningful structural reinforcement. Because it is water-resistant rather than waterproof, a bathroom or wet-area design may still require a bonded waterproofing membrane.
An uncoupling membrane may replace backer board where the specific system permits installation over the existing substrate. That can reduce height and simplify the stack, but the underlying floor must already meet structural, surface, fastening, and compatibility requirements.
Crack isolation addresses qualifying minor in-plane cracking; waterproofing addresses water passage. Those are separate performance categories. Waterproofing succeeds only when the field membrane, seams, perimeter, penetrations, drains, and transitions are detailed as one continuous assembly.
A reinforced mortar bed is another legitimate route, but it is not a generic add-on. Its thickness and reinforcement affect dead load and finished height, so suitability must come from an applicable approved design.
Once the assembly is selected, use the current instructions for the whole system. Mortar type, primer, fasteners, panel gaps, seam treatment, membrane orientation, cure time, tile size, and substrate compatibility vary. Do not transfer instructions from one board thickness, membrane model, or mortar formula to another.
Special conditions and the final go/no-go checklist
Bathrooms and wet areas
Moisture-resistant backer board is not the same as a waterproof floor. Where the design calls for waterproofing, use a compatible bonded system and complete its seam, edge, penetration, drain, and transition details. Do not assume an uncoupling membrane is waterproof unless its documentation says so and all specified accessories are installed.
Large-format tile
When any tile edge is 15 inches or longer, the cited maximum variation tightens to 1/8 inch in 10 feet. Correct the substrate first so the tile can receive uniform support rather than using setting mortar to chase broad humps and hollows during installation, as summarized in this large-format tile flatness guidance.
Natural stone
L/720 is commonly cited for most natural-stone tile, and wood-floor assemblies may need more demanding structural layers or a specifically approved method. Verify the complete stone assembly rather than modifying a ceramic-tile method by guesswork; the distinction between the commonly cited L/360 and L/720 criteria is discussed in this wood-subfloor technical article.
Radiant heat
Thermal cycling adds another movement condition. Confirm that the primer, leveling material, membrane, mortar, waterproofing system, and tile are approved for the exact heating system and expected operating conditions. Follow both systems’ requirements for placement, cure, commissioning, and movement accommodation.
Movement joints
Honor structural and movement joints instead of rigidly bridging them with tile and grout. Maintain the specified perimeter gaps and use the required flexible treatment at changes of plane, transitions, and other designated movement locations. Membranes do not erase the need for movement joints.
Final go/no-go check
Proceed only when every answer is yes:
- [ ] The substrate is identified as plywood, OSB, planks, concrete, or a verified combination.
- [ ] Joist or slab condition has been checked.
- [ ] Damaged, rotten, swollen, delaminated, or loose material has been repaired or replaced.
- [ ] Wood panels and edges are secured and supported.
- [ ] Legacy materials have been assessed before sanding, grinding, scraping, or demolition.
- [ ] Flatness has been measured against the actual tile size.
- [ ] High and low areas have an approved correction plan.
- [ ] Concrete moisture meets the selected system’s testing and acceptance requirements.
- [ ] Slab cracks have been documented, with uncertain or adverse conditions referred for evaluation.
- [ ] Finished height has been calculated through the tile.
- [ ] Every underlayment layer has a defined job.
- [ ] Mortars, primers, membranes, boards, fasteners, and accessories are mutually compatible.
- [ ] Current product instructions and the applicable installation method are available.
The decision rule is straightforward: first prove that the framing or slab and structural subfloor are sound. Then repair damage and correct flatness. Next address moisture, cracks, and movement. Only after that should you select the board, membrane, patch, or mortar-bed system that performs the remaining job.
If the floor still bounces, contains damaged wood, has unsupported seams, shows active, uncertain, or vertically displaced cracks, remains persistently damp, indicates hydrostatic pressure, or cannot be matched to an approved assembly, stop before setting tile and obtain qualified guidance.